
Quick Fix: Mobile Phone

The trend in modern mobile phones is towards media based devices centred on internet connectivity. As a result devices are larger, often heavier and tend to have much shorter battery lives. This isn’t as good for me as a lightweight backpacker, and so rather than carry my normal phone with me on the hill, instead I now carry a small basic model which I picked up for the princely sum of £10 (including a SIM card). It’s a basic, no frills mobile phone that only makes calls and texts – simple! To me, it has many benefits over my usual phone:
- Weight Saving: The device is extremely light, weighing only 66 grams(!), that’s less than half the weight of my current ‘everyday’ phone at 130 grams.
- Size: This phone is also much smaller, taking up much less bulk in my pack.
- Durability: The device feels sturdy and has robust rubberised buttons that can be used easily with gloves on, and has also survived a few drops.
- Peace of Mind: At £10, I’m really not too worried about whether the phone gets wet or damaged within my rucksack.
- Superior Battery Life: The battery life is vastly superior to my everyday phone, on standby I’ve found the phone has remained powered for over ten days without requiring charge, unlike my other phone which needs to be charged every other day.
Changing the phone I take out onto the hill has proven to be quite insightful to me, as it has once again proven to me that examining every piece of kit in a lightweight backpack is really beneficial, not just to save weight, but also in analysing and maximising the usefulness of every piece of kit in my pack.
Light Outdoor Gear Blogger
Quick Fix: Eyedropper Bottles

For this quick fix please check out the following link for a great tip by Brian Green. Simply Genius!
http://www.briangreen.net/2011/03/eyedropper-bottles-ultralighters-friend.html
Light Outdoor Gear Blogger
Sea to Summit eVac Dry Sack Review

Sea to Summit eVac Dry Sack Review:
Here’s a review of Sea to Summit’s eVac Dry Sack, a waterproof dry bag that features eVENT fabric on the base to allow excess air to be purged from the sack.
First off be under no illusions. If you are desperately seeking to shave every single last potential gram off of your pack weight, this is not the dry sack for you. For that matter the concept of a dry sack itself may seem like a ridiculous concept. This blog, and my personal focus and interest, is with lightweight gear, not ultra or super-ultra light gear. I think in the near future I’ll write a more substantial piece on just this point, and explain my own position and reasoning. Back to the dry sack though, until now I’ve used a Sea to Summit Ultra Sil Dry Sac (8 litre) to stow my down bag in. It keeps it dry and fairly compact and weighs a total of 30 grams. Although seeming like an ideal solution, it can be really difficult to compact down to a small size once my sleeping bag has been squeezed in, and so it seems to occupy an unnecessary amount of space in my pack.
I have been looking for a solution for a little while, specifically at Podsacs air stream range (the ‘lite‘ model in particular). Although seeming like a good option I wanted to have a look at one in person and hadn’t seen them in any outdoor shops near me. Online they have been selling for around £15 and for that price I just couldn’t justify buying one. Then, as luck would have it, my local outdoor shop got some of the Sea to Summit equivalents in on sale for only £6… SOLD!
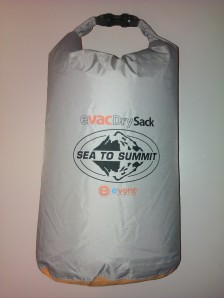
This is the 8 Litre version. 3, 5, 13, 20, 35 and 65 Litre variants are also available.
I bought a couple, but specifically for my sleeping bag I bought the 8 Litre size. It doesn’t feature the strap on the base of the sack to help hold onto the bag as you pull out the contents (the podsac model does), but my old Ultra Sil model didn’t either, and it never seemed a problem. I did chop off the D-Loop at the top of the bag to save a couple of grams and to stop it catching on things as I pull it out of my rucksack and after that one modification it comes through at 58 grams on my scales. The build quality seems great and the main body fabric seems really hard wearing.
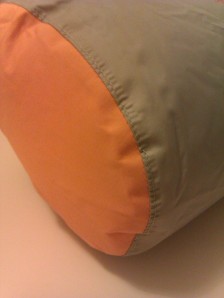
eVent Base: Note how there is no strap to hold onto when removing items from the dry sack.
The eVent membrane at the base of the pack is a genius idea. My down bag can be messily stuffed into the dry sac, and after only a few rolls at the top of the sack, a moderate squeeze of the sides allows the trapped air to escape from the air permeable eVent membrane, allowing the size of the sleeping bag to be compressed mightily. The fabric still remains completely waterproof, but eVent’s unique construction allows air to escape. If you want the science, you can find it here. The fabric itself is still comparatively light and non-bulky, which is probably why (as far as I am aware) Polartec NeoShell hasn’t been used in this way.
As I have mentioned in a previous post, I like to use my sleeping bag’s dry sack in conjunction with a buff as a pillow. I stuff it with a fleece and then pull the buff over the dry sac to make it more comfortable. This dry sack is much better as a pillow, as it allows some air out meaning the pillow isn’t too rigid to rest on.
Although this non-essential item is almost twice the weight of the dry sac it has replaced, I really feel the time, stress and effort saved in the morning when trying to pack away my sleeping bag is well worth the few extra grams. I’m sure the Podsac equivalent is just as good, but I’m really glad I managed to pick this one up, especially when on sale!
Light Outdoor Gear Blogger
Blog Update and Lifeventure Travel Mirror Review

First off, apologies for the drought in blog posts, work and time constraints have limited me somewhat, but I do check for comments/ feedback on a regular basis, so feel free to ask questions, suggestions or provide your own tips or advice, I will endeavour to respond to them all. I have a few more posts lined up for the near future including an ultralight sleeping bag review, down mid-layer comparison and waterproof over-trouser write up. Thanks for checking out this blog, please favourite/bookmark and feel free to comment or ask questions.
Thanks once again,
Light Outdoor Gear Blogger
Now it’s time for a no doubt enthralling mirror review?!:
Lifeventure Travel Mirror Review:

I recently picked up a new lightweight mirror to add to my kit bag. OK, so this doesn’t necessarily sound like the most exciting of purchases, however this mirror completes a long search for a lightweight field mirror solution.
No, I am not incredibly vain whilst on the hill, rather the mirror serves two main purposes. Firstly, I find a mirror to be exceptionally useful to inspect injuries, cuts, splinters and stings. Secondly, should any tech devices malfunction, it can be used as a signalling device in potential emergency situations. Oh, and it is also a useful tool to help shave and clean yourself up with… *Cough* Vain *Cough* ! For these reasons though, I really think it’s worth carrying a mirror in my pack, but like most kit carrying decisions it’s subjective to your own personal preference.
Finding a decent quality mirror for trekking / hiking use is surprisingly difficult. I originally used to use a piece of acrylic mirror that had come out of a military camouflage paint pack. It fulfilled the criteria of being lightweight (weighing approx. 16 grams) but provided a really poor, blurred reflection. It was also really fragile and the painted mirror surface flaked and scratched in no time at all. Following this, I switched to a compact glass mirror which was a vast improvement in image quality, but the weight penalty shot up to 46 grams. This has bugged me for a while and has been an item on my kit list that has been flagged as excessively high for a long while.
The Lifeventure Travel Mirror weighs in at 17 grams on my scales, features a 3 gram scratch pouch and a neck/carry cord. I ditched the cord straight away, and so the combined weight penalty for my pack is 20 grams. Being made out of stainless steel, it feels really sturdy and has so far proved very durable. It’s an ideal size and for £5 is relatively well priced. All in all, this has been a great pick-up and has finally reduced the weight of an item on my kit list that has bugged me for a while.
Starbucks VIA Italian Roast
Starbucks Via – Italian Roast:

Just a short one today. I thought I would give a mention to one of my pack staples: combined instant-microground coffees, specifically Starbucks Via. I love drinking coffee when out and about, and over the past few years a number of lightweight high quality ‘instant-esque’ coffees have come to market. These combine microground real coffee with soluble instant coffee. I’ve samp
led many including Kenco’s ‘Millicano’ and Nescafe’s ‘Azera’, but I found that my personal favourites are the Starbucks options. I’m in no way a Starbucks fanboy, but I found that these little sachets offer the most realistic flavour. My favourites of the range are the columbian and italien blends, the itallian is distinctly stronger hence the ‘extra bold’ on the sachet oacket but this really helps to wake me up on a wet tent morning. The comlumbian flavour is much more subtle and nutty and makes a great afternoon kickstarter. I should point out that these are in no way a substitute for real filter coffee, however at under 3 grams per brew in my pack they are convincing enough to allow me not to take a proper filter set and take these instead.
Oh yeah… price. Well the Starbucks happen to be the most expensive of all these coffees, but give a few a try and get a taste for your own favourites. I bought a load in bulk and so they work out to around 45p a cup. The Nescafe and Kenco alternatives are much more affordable at around half that price, so you could save yourself a small fortune in the long run if you get a taste for those instead…
Light Outdoor Gear Blogger
MSR MicroRocket Review
MSR MicroRocket Review:

 This however does not mean that performance and practicality suffer as a result of shaving the grams off. MSR have clearly listened to their customer base on improving the stove’s design and functionality. For example, the niggle that the pot supports on the PocketRocket were a little too small and unstable have been negated here, in turn despite its small size and lower weight, the MicroRocket sports larger pot supports, yet it still feels study and robust, so much so that in my opinion it feels stronger than the PocketRocket. Quite an achievement!
Having only been released at the start of 2012, and myself having only had it for a short period of time, I cannot comment fairly regarding the stove’s level of gas consumption in regard to efficiency and boil time. Anecdotal as this may sound however, from the limited use I have had with it, there is no noticeable drop off in performance from the original PocketRocket. (Have you noticed already that I am smitten by this thing?)
Also included in the box is a 13g Piezo Ignitor, I’m not sure what to make of this yet; I think I may just continue to carry a Mini Bic or similar regular lighter instead which normally weight in at 10g for me, but I’ll give this a chance and I’ll aim to post a follow up review in the future, after its had some good use.

So, I presume you’re wondering: ‘what’s the downside?’. Well it certainly isn’t the price; at a very respectable £39.99 it compares well to to other competitors such as the Optimus Crux. Furthermore, the packaging and instructions make it feel like money well spent. Also, with the Piezo Ignition and case included it definitely feels like value for money. But there it is, the case. So after all of MSR’s expertise going into not only extending the size of the pot support circumference, shaving off the grams and compacting the pack size, their hard work is undone through the excessively heavy weight of the case. Weighing in on my scales at 36 grams it sure isn’t light, but somehow weighs more than the larger sized original PocketRocket case. Very strange. In reality though, if you are concerned enough about spending out for a ridiculously light gas stove, you’re probably not going to carry the case with you in your pack (I for one certainly don’t) so it is not really too big of a negative factor, but still it seems curious that for all that time effort and skill spent going into making a brilliantly light, well designed piece of kit to then be undone by the unnecessary weight of the case? Anyway, I feel I’m now ranting and so I shall move on…

So to give somewhat of a summary, I think this is a fantastic piece of gear and it has immediately earnt it’s way into my pack. The MicroRocket has everything the PocketRocket has, yet also manages to shave weight and fit into a smaller space. It’s hard to see how the PocketRocket will contend with the Micro from now on, as I cannot see any reason why anyone would buy the Pocket over the Micro (lightweighters or not). In the long term it will be interesting to see how I fare with the Piezo Igniter, especially considering a Bic Mini or similar lighter is cheaper, weighs less and I don’t feel so bad about losing one of them! I won’t get started on the case again because who knows when I’ll stop harking on about that, hopefully I described my thoughts on that adequately enough earlier on in the post) All in all though great stove, great price and great build quality. It will be staying in my pack for the foreseeable future and shall serve me many a hot brew and meal! ( I hope… )
If you have any questions, feedback or comments please leave them below.
Light Outdoor Gear Blogger
The Original Buff, A Review and Some Weight-Saving Uses
The Original Buff, A Review and Some Weight-Saving Uses:

Buffs feel as if they have been around for an eternity, but I’ve yet to find a dedicated blog post regarding their uses in lightweight and ultra-lightweight camping and trekking, so here’s my attempt at one. In case anyone is unsure as to what a Buff is, in a sentence, it’s a seamless microfibre polyester ‘tube’ of fabric that can be worn in a number of ways to provide warmth, wicking properties and some degree of wind protection. There are a few options available including models incorporating Windstopper and fleece materials. Here though I shall be focusing on the ‘Original Buff’
Headwear:
The first use is really quite obvious: headwear. The Buff website highlights all the ways it can be worn at the following link, so if you haven’t seen the many ways of wearing one, check them out here: http://www.buffwear.co.uk/pages/product-info/ways-to-wear.php. As a hat, the Buff offers it’s first instance of weight saving within my pack. The Original Buff that I own weighs 38 grams, which is lighter than most fleece hats available. Although the Original Buff isn’t as insulative as a bog standard fleece hat, I have found that the combination of the buff as a hat underneath the hoods of the clothing I am wearing, in turn provides ample warmth for my trips on the hill (including Scotland). I only really ever use it as a hat, scarf , balaclava and occasionally sweatband, but these uses alone justify me carrying. The following features are therefore additional to this primary use.
Water Pre-Filter:
I use my Buff as a pre-filter for water when I fill up my Platypus from streams etc. The idea being that I place a small area of fabric over the mouth of the Platypus and as I submerge the mouth of the bladder under water, the fine weave of the Buff keeps bits of debris out of the bladder whilst letting water in easily. If I’m careful I only get around a 10cm² area of material wet, which once rung drys surprisingly quickly (to purify the water I use sterilisation tablets, as the Buff does nothing in this respect). I know many people don’t really mind tiny bits of floating debris in their water, and to be honest it isn’t my greatest concern when on the hill. However, I find it makes cleaning my platypus much easier and when drinking water direct from the platypus and when drinking a hot brew on the hill it does feel like a luxury not having suspicious flecks floating about! This ‘luxury’ comes at no weight penalty either as the Buff’s first use for me is always as a hat.
*Its worth mentioning that for hygiene reasons, when I use the Buff as a pre-filter, I make a big emphasis on thoroughly washing the area of material that I used, in case I go on to use the Buff as a pillow case / hat etc.
Pillowcase / Pillow:
A tip which I have more recently adopted is a culmination of ideas from a friend and from a blog post by the ever fascinating Robin over at blogpackinglight (http://blogpackinglight.wordpress.com/2011/09/13/buff-pillow-cover/). In the post a Buff is used as a ‘pillow case’ over an inflatable pillow. A great idea. I however have never been too concerned with taking a pillow onto the hill (a decision which is purely personal preference, as I can fully understand why others would). When carrying a Buff, I make a makeshift pillow one of two ways (depending on how tired / how much effort I have). If I’m really tired I quickly grab a fleece, roll it neatly (zips, toggles etc facing inwards) and pull the Buff over as a sleeve for softness and to hold the thing together if I move in my sleep. Should I have more time and effort I grab a dry sak (normally the one used to carry my down bag) capture a small amount of air in it, roll it down to seal the air in and pull the buff over that. In the night this can deflate a little so placing a fleece inside can also be a good option. By using the Buff in this way, for no weight penalty, and by carrying no dead weight during the day, a very serviceable, comfortable and soft pillow can be created.
Towel:
This one really needs little explanation. However I tend not to use my Buff for this all that often, as I find there is just to much moisture absorbed over too great an area, meaning that when the Buff is used as a hat (its primary use) it’s less than comfortable to use. On those rare occasions when I’m staying on a ‘proper’ camp-site, rather than wild camping, I do seem to find myself using it as a small face towel more, so I thought it worth flagging up.
—
All in all, the Buff is a cracking bit of kit. It’s many uses beyond that of just headwear make it well really versatile. The longevity and hard-wearing nature also seem good, having had many washes both within a washing machine and on the hill. If I’ve got anything negative to say it would probably be the price. At around £10 (last time I bought one) for what is just 38 grams of polyester, it does seem a little steep, but it’s quality and versatility prevail.
Got any other uses for it?, then please leave a comment 🙂
Light Outdoor Gear Blogger
Dr Bronner’s 18-in-One Peppermint Soap Review
 Dr Bronner’s 18-in-One Peppermint Soap Review:
Dr Bronner’s 18in1 soap is a staple of the ultralight community. I recently read a great review of the soap’s purported many uses by Alison Pels (this can be found at http://brokelyn.com/tested-the-crazy-alleged-uses-of-dr-bronners-soap/). Here Pels takes a great look at what this soap can be used for, so rather than provide a second rate intro to the product, try checking out the above link for a more comprehensive report.
In a lightweight pack Bronner’s earns it place by becoming a great do it all wash kit item. For me it acts as a soap (obviously), cook kit cleaning liquid, washing detergent (should the need arise) and toothpaste (well, liquid rather than paste). When stored within a sterilised eye dropper bottle (thanks Brian [http://www.briangreen.net/2011/03/eyedropper-bottles-ultralighters-friend.html]) the total weight penalty for all of the above uses within my pack totals a mere 18 grams.
In active use, it’s hard for me to think of anything replacing this in my pack any time soon. Ok, so the taste isn’t fantastic when brushing your teeth (even in peppermint flavour), but when only using a couple of drops, there is no lingering soapy taste that many other bloggers have commented on. It really seems to go a long way: although I carry 10ml of it, I still have some spare following a 3/4 day trek. I’ve only ever bought the peppermint flavour, but I think I may try some of the others available next time, as I found that when used as a soap on a cold early morning, peppermint flavour feels a little biting on the skin.
In my opinion, Bronner’s is an iconic item of an ultra / lightweighter’s pack. Using it pushes that boundary between comfort and weight-saving. For me, after taking the plunge and giving it a try, it has earnt it’s place in my pack and I can’t imagine that changing any time soon.
Light Outdoor Gear Blogger
Hello, Welcome and Thanks!
Writing this, my first post of my first blog, is actually quite a tough task and so as a result this will probably end up being quite a brief first post…
Anyway, I have decided to create this blog because I follow quite a few other online blogs, yet now I feel I want to get more involved in the lightweight outdoor community and share some of my own views on gear, routes and experiences regarding lightweight trekking and camping. Over the foreseeable future, I shall be uploading plenty of content aimed at just this. I hope that the combination that I’m: (A): based in the UK and (B) a lightweight trekker, will mean this blog offers something a little different from the many other ultra lightweight / lightweight blogs out there.
For now though, I really appreciate you taking the time to check this out. I hope that you do return soon to view my future posts, other content and general lightweight outdoor musings.
Cheers,
Lightweight Outdoor Gear Blogger
(I told you this post would be brief!)
 Light Outdoor Gear
- Quick Fix: Mobile Phone
- Quick Fix: Eyedropper Bottles
- Sea to Summit eVac Dry Sack Review
- Blog Update and Lifeventure Travel Mirror Review
- Starbucks VIA Italian Roast
- MSR MicroRocket Review
- The Original Buff, A Review and Some Weight-Saving Uses
- Dr Bronner’s 18-in-One Peppermint Soap Review
- Hello, Welcome and Thanks!
